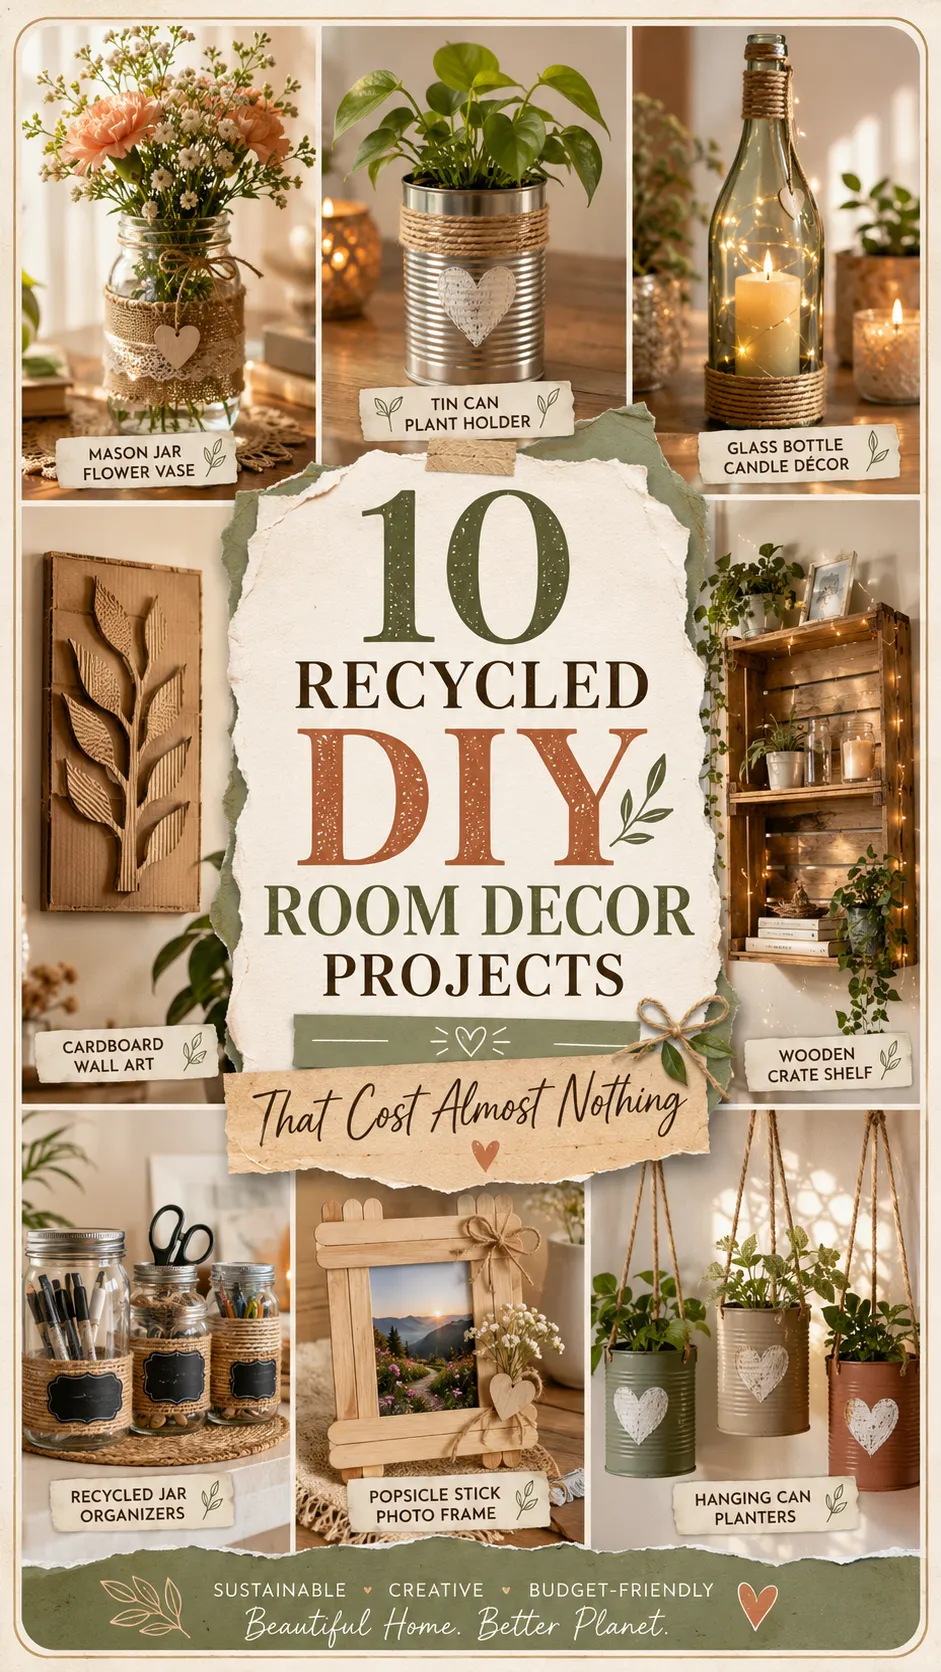
Giving your room a fresh, stylish look does not require an expensive shopping trip or a cart full of brand-new decorations. Some of the most creative, personal, and eye-catching décor pieces can be made from items you already have at home.
Empty glass jars, cardboard boxes, old magazines, tin cans, fabric scraps, plastic bottles, and worn-out picture frames often end up in the trash. However, with a little imagination, these everyday materials can become beautiful organizers, wall decorations, planters, lamps, and storage solutions.
That is exactly what makes recycled DIY room decor projects so valuable. They help you decorate on a limited budget while reducing waste and giving forgotten objects a second life.
You do not need advanced crafting skills, professional tools, or expensive supplies. Most of these projects require only basic materials such as glue, scissors, paint, string, and items collected from around your home.
Whether you are decorating a bedroom, dorm room, home office, study corner, or small apartment, the following projects can help you create a space that feels more organized, inviting, and uniquely yours.
What Are Recycled DIY Room Decor Projects?
Recycled DIY room décor projects are decorative or functional items made by repurposing materials that would otherwise be thrown away.
Common recyclable crafting materials include:
- Cardboard packaging
- Glass bottles and jars
- Plastic containers
- Old clothes and fabric scraps
- Newspapers and magazines
- Tin cans
- Wooden crates
- Bottle caps
- Used picture frames
- Empty toilet paper rolls
These materials can be transformed into attractive room accessories without requiring a large decorating budget.
The best recycled projects combine three qualities: they look good, serve a useful purpose, and are simple enough to complete at home.

Quick Comparison of the 10 Recycled Room Decor Projects
| Project | Approximate Time | Difficulty | Maintenance | Best Feature |
|---|---|---|---|---|
| Glass Jar Lanterns | 30–45 minutes | Easy | Low | Warm ambient lighting |
| Cardboard Wall Organizer | 1–2 hours | Easy | Medium | Practical storage |
| Tin Can Planters | 45–60 minutes | Easy | Medium | Adds greenery |
| Magazine Wall Art | 1–2 hours | Medium | Low | Colorful visual impact |
| Plastic Bottle Hanging Planters | 1–2 hours | Medium | Medium | Saves floor space |
| Fabric Scrap Garland | 30–60 minutes | Easy | Low | Soft, playful texture |
| Cardboard Rope Basket | 2–3 hours | Medium | Medium | Stylish organization |
| Bottle Cap Mosaic | 2–4 hours | Medium | Low | Unique artistic statement |
| Upcycled Picture Frame Tray | 1–2 hours | Easy | Low | Decorative functionality |
| Toilet Roll Mirror Frame | 2–3 hours | Medium | Low | Expensive-looking wall accent |
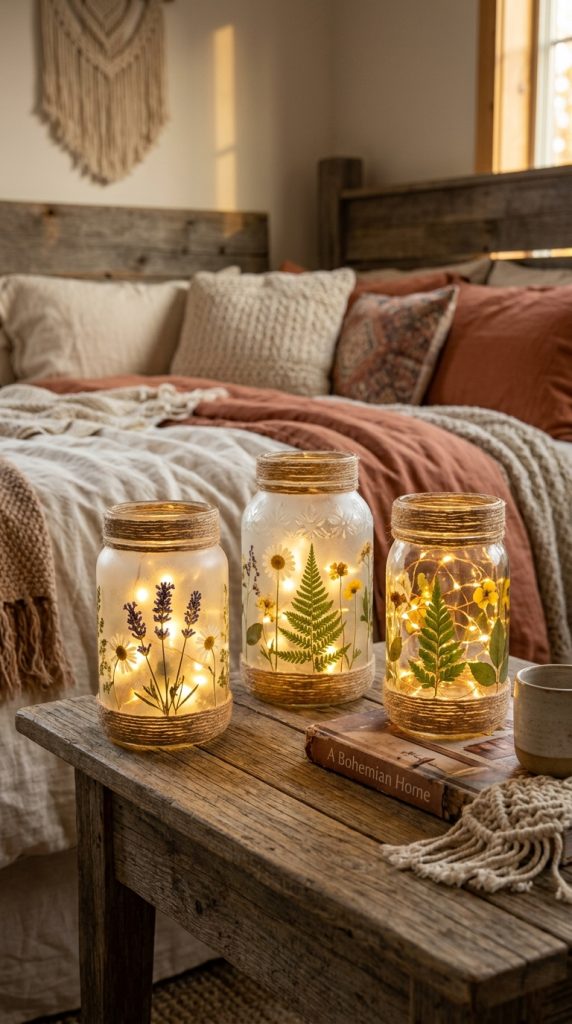
1. Glowing Glass Jar Lanterns
Empty jam jars, sauce jars, and coffee containers can be transformed into beautiful lanterns for a bedside table, bookshelf, or reading corner. The glass reflects light softly, creating a warm and relaxing atmosphere.
You can decorate the jars with paint, twine, pressed leaves, lace, tissue paper, or small pieces of recycled gift wrap.
Who This Project Suits Best
Glass jar lanterns are ideal for:
- Beginners who want a simple first project
- Students decorating dorm rooms
- People who enjoy cozy or bohemian interiors
- Anyone looking for inexpensive mood lighting
- Renters who cannot install permanent lighting fixtures
How to Make It
- Wash the glass jar thoroughly and remove its label.
- Dry the jar completely.
- Apply frosted glass paint or diluted acrylic paint to the outside.
- Wrap twine, lace, or ribbon around the top.
- Add a battery-operated LED tea light.
- Place the lantern on a stable surface.
Decorating Tips
For a frosted effect, dab paint onto the glass using a sponge rather than a brush. You can also attach dried flowers to the outside with decoupage glue.
Create a matching set of three jars in different heights for a more polished display.
Benefits
- Creates soft and relaxing light
- Reuses glass containers
- Costs very little to make
- Can be customized for any color scheme
- Works throughout the year
Safety Note
Use battery-powered LED candles instead of real flames, especially when decorating with paper, fabric, twine, or dried flowers.
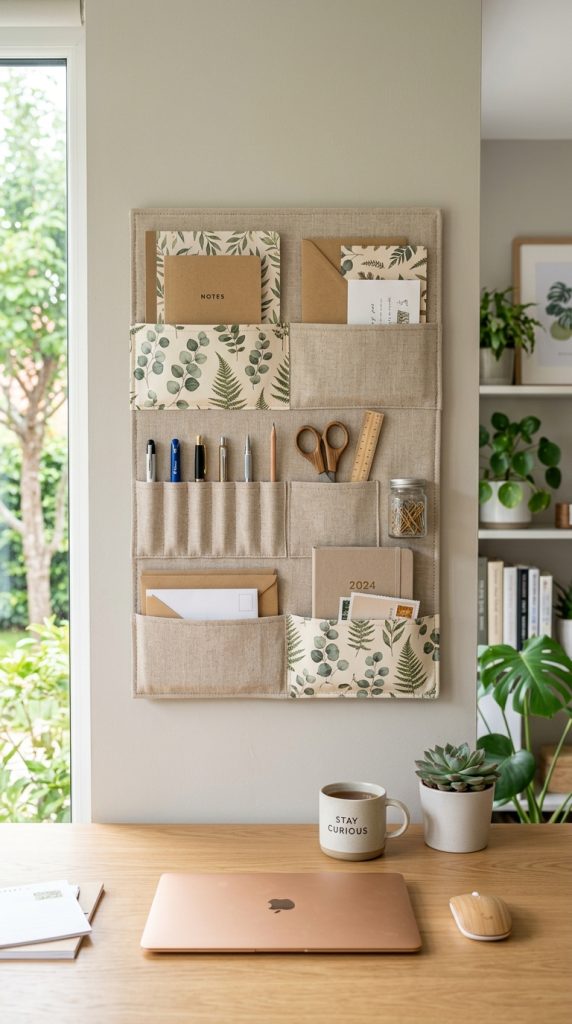
2. Cardboard Desk and Wall Organizer
Online shopping boxes and cereal cartons are excellent materials for building an organizer. Instead of purchasing plastic storage units, you can create custom compartments for notebooks, mail, stationery, makeup, or craft supplies.
A cardboard organizer can sit on a desk or be mounted securely on a wall.
Who This Project Suits Best
This project is especially useful for:
- Students with limited desk space
- People working from home
- Craft enthusiasts
- Anyone organizing a small bedroom
- Families creating homework stations for children
How to Make It
- Cut several cardboard boxes into pockets of different sizes.
- Reinforce weak edges with additional cardboard strips.
- Arrange the pockets on a larger cardboard backing.
- Glue each section securely in place.
- Cover the organizer with leftover wallpaper, newspaper, fabric, or paint.
- Add handwritten or printed labels.
- Attach it to the wall using suitable hooks or strong removable strips.
Decorating Tips
Use wrapping paper left over from gifts to create a clean, coordinated finish. For a minimalist appearance, paint the entire organizer in one neutral shade.
Protect heavily used sections with clear adhesive film.
Benefits
- Reduces desktop clutter
- Can be designed for exact storage needs
- Makes use of packaging waste
- Fits small rooms
- Encourages better organization
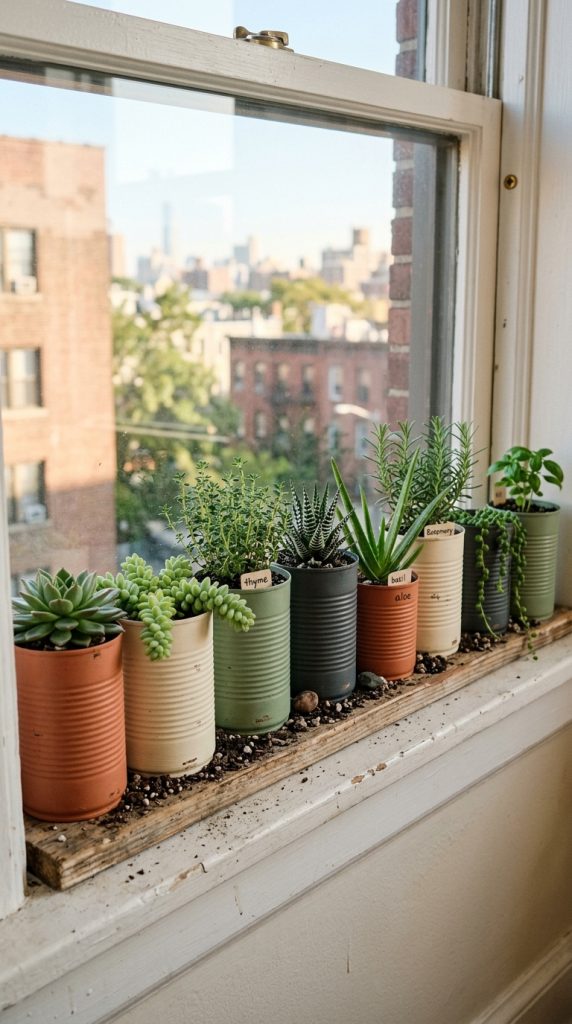
3. Painted Tin Can Planters
Food cans can become modern planters for herbs, succulents, artificial plants, or small flowers. Their simple cylindrical shape works well with industrial, farmhouse, minimalist, and colorful décor styles.
A row of matching tin can planters looks especially attractive on a windowsill.
Who This Project Suits Best
Tin can planters suit:
- Indoor gardening beginners
- People with sunny windows
- Small-apartment residents
- Fans of farmhouse or industrial décor
- Anyone seeking low-cost shelf decorations
How to Make It
- Wash the tin cans and remove all labels.
- Make sure no sharp edges remain.
- Add small drainage holes to the bottom when using live plants.
- Apply a metal-safe primer if available.
- Paint the cans with acrylic or spray paint.
- Add patterns, labels, or decorative rope.
- Fill them with soil and suitable plants.
Styling Tips
Group three cans together and vary their heights by placing one on a small stack of books. Matte black, white, terracotta, and muted green create a sophisticated effect.
For a cheerful room, paint each can in a different bright shade.
Benefits
- Introduces plants into the room
- Reuses durable metal containers
- Easy to repaint when décor changes
- Suitable for shelves and windowsills
- Can also hold pens or makeup brushes
Practical Tip
Place a small saucer beneath each planter to protect furniture from moisture.
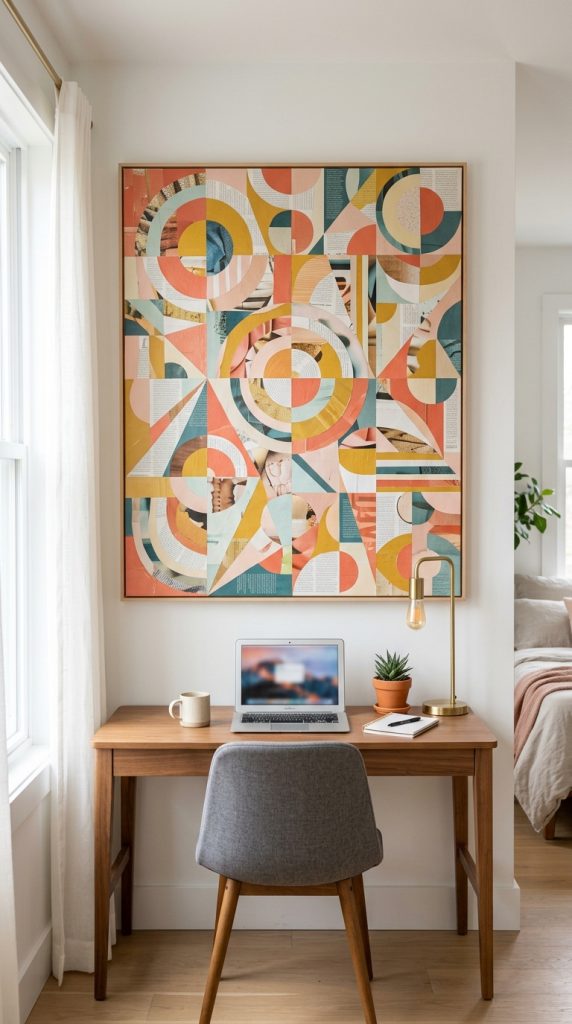
4. Colorful Magazine Wall Art
Old magazines are filled with colors, lettering, patterns, and photographs that can become original wall art. You can cut the pages into geometric shapes, flowers, rolled-paper designs, or abstract collages.
This project allows you to create art that perfectly fits your room’s color palette.
Who This Project Suits Best
Magazine wall art is a strong choice for:
- Creative teenagers
- Art students
- Maximalist décor lovers
- People with blank walls
- Anyone wanting personalized artwork
How to Make It
- Select magazine pages in your preferred colors.
- Decide on a design, such as a heart, landscape, rainbow, initials, or abstract pattern.
- Cut or tear the pages into smaller pieces.
- Arrange the pieces on reused cardboard before gluing.
- Attach each piece carefully.
- Seal the finished collage with a thin coat of decoupage glue.
- Display it in an old frame or hang it directly.
Styling Tips
Limit your collage to three or four main colors to prevent the finished art from looking chaotic.
For a contemporary design, cut the pages into equal triangles and arrange them in a geometric pattern.
Benefits
- Produces completely unique wall art
- Reuses magazines and cardboard
- Offers unlimited design possibilities
- Can fill large wall spaces inexpensively
- Encourages artistic experimentation
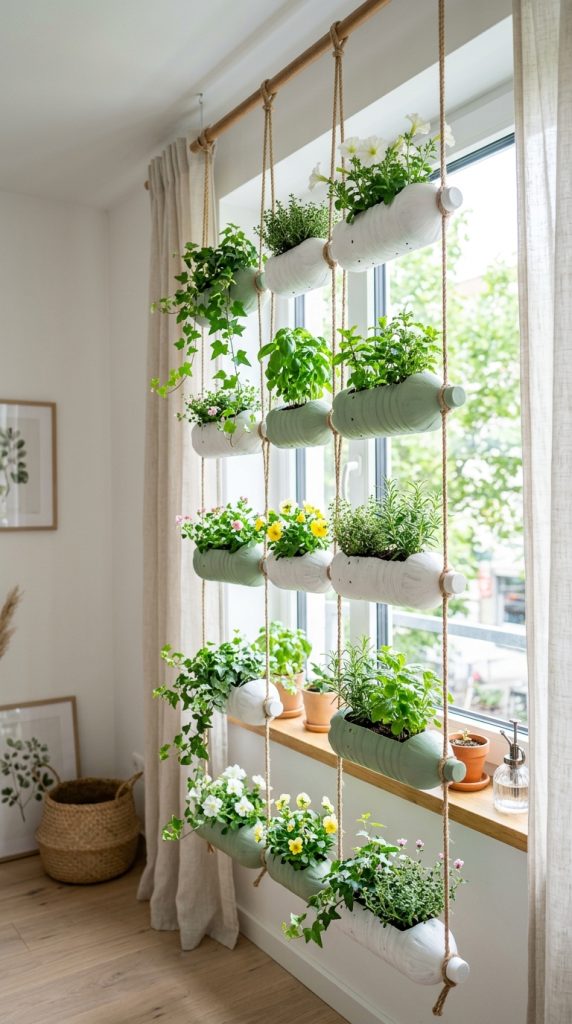
5. Plastic Bottle Hanging Planters
Plastic bottles are among the most common household waste items. Turning them into hanging planters keeps them out of the trash while introducing greenery into unused vertical spaces.
These planters can be hung near a window, on a balcony, or from a sturdy wall-mounted rail.
Who This Project Suits Best
Plastic bottle planters are useful for:
- People with limited floor space
- Apartment and dorm residents
- Indoor herb growers
- Families crafting with older children
- Anyone interested in sustainable gardening
How to Make It
- Clean and dry each plastic bottle.
- Mark a large rectangular opening along one side.
- Ask an adult to cut the opening when necessary.
- Add drainage holes to the opposite side.
- Paint or wrap the bottle to hide the plastic.
- Make holes near both ends for hanging cord.
- Thread strong cord through the holes.
- Add soil and lightweight plants.
- Hang the planter from a secure support.
Styling Tips
Use identical bottles to create a balanced vertical garden. Paint them in the same color for a clean finish or use complementary colors for a playful display.
Trailing plants soften the shape of the containers and help disguise their recycled origin.
Benefits
- Makes use of vertical space
- Reduces plastic waste
- Supports indoor gardening
- Costs almost nothing
- Can be expanded as more bottles become available
Important Safety Tip
Do not hang heavy, water-filled planters from weak adhesive hooks. Use supports designed to carry the completed weight.
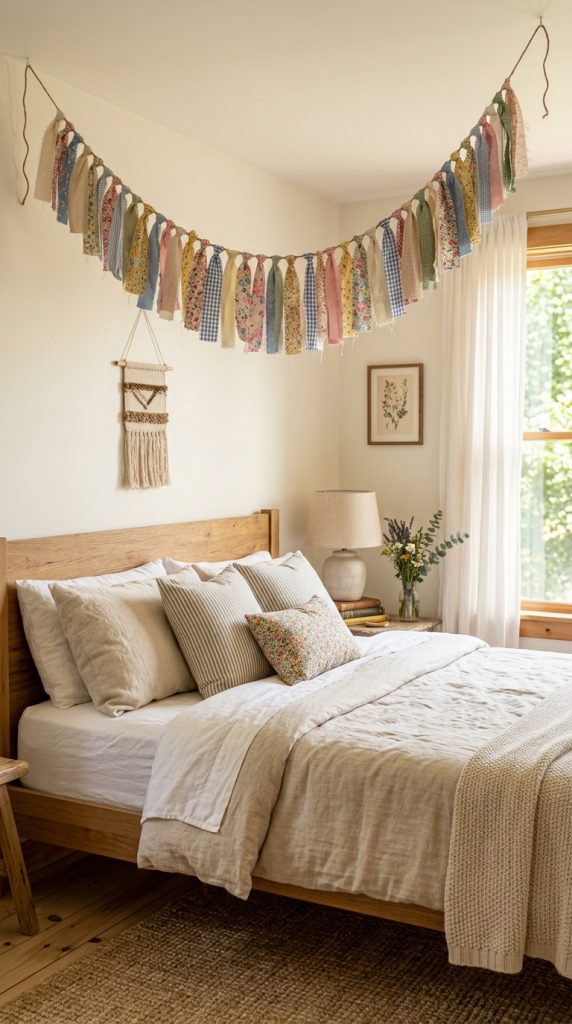
6. Fabric Scrap Garland
Small fabric pieces from old shirts, damaged dresses, pillowcases, and sewing projects can be turned into a decorative garland. The mixture of colors and textures adds softness to walls, bed frames, shelves, mirrors, or windows.
This is one of the easiest recycled DIY room decor projects because it requires little measuring and may not require sewing.
Who This Project Suits Best
Fabric garlands work particularly well for:
- Bohemian bedrooms
- Children’s rooms
- Party decorations
- Cottage-inspired interiors
- People who prefer no-sew crafts
How to Make It
- Collect clean fabric scraps.
- Cut them into strips of similar length.
- Prepare a long piece of string, ribbon, or reused cord.
- Tie each fabric strip around the cord.
- Alternate colors and patterns.
- Trim any pieces that appear too long.
- Hang the garland loosely across the chosen area.
Styling Tips
Choose scraps from one color family for an elegant appearance. Mixing floral, striped, and solid fabrics creates a more relaxed, eclectic look.
Add recycled paper shapes between the fabric strips for extra detail.
Benefits
- Requires no advanced crafting skills
- Reuses very small fabric pieces
- Adds color and movement
- Easy to change or expand
- Suitable for temporary and permanent decoration
7. Cardboard and Rope Storage Basket
Decorative storage baskets can be surprisingly expensive. Fortunately, a sturdy cardboard box and leftover rope can create a similar look for a fraction of the price.
The finished basket can store blankets, cables, craft materials, toiletries, books, or toys.
Who This Project Suits Best
This upcycled basket is ideal for:
- Anyone needing attractive storage
- Small-room organization
- Farmhouse and coastal interiors
- Families organizing children’s belongings
- Budget-conscious decorators
How to Make It
- Select a strong cardboard box in the required size.
- Reinforce the base with another cardboard layer.
- Fold or cut the top flaps neatly.
- Begin gluing rope around the bottom edge.
- Continue wrapping the rope upward in tight rows.
- Press each row firmly against the previous one.
- Line the inside with fabric from an old shirt or pillowcase.
- Add handles made from braided fabric or rope.
Styling Tips
Use natural jute for a rustic finish. Cotton rope creates a softer, modern appearance.
A contrasting fabric liner can make the basket look professionally finished.
Benefits
- Provides practical hidden storage
- Gives cardboard packaging a second life
- Looks more expensive than it is
- Can be made in custom sizes
- Helps maintain a tidy room
Durability Tip
Avoid using the basket for wet objects or extremely heavy items. Cardboard works best for lightweight, dry storage.
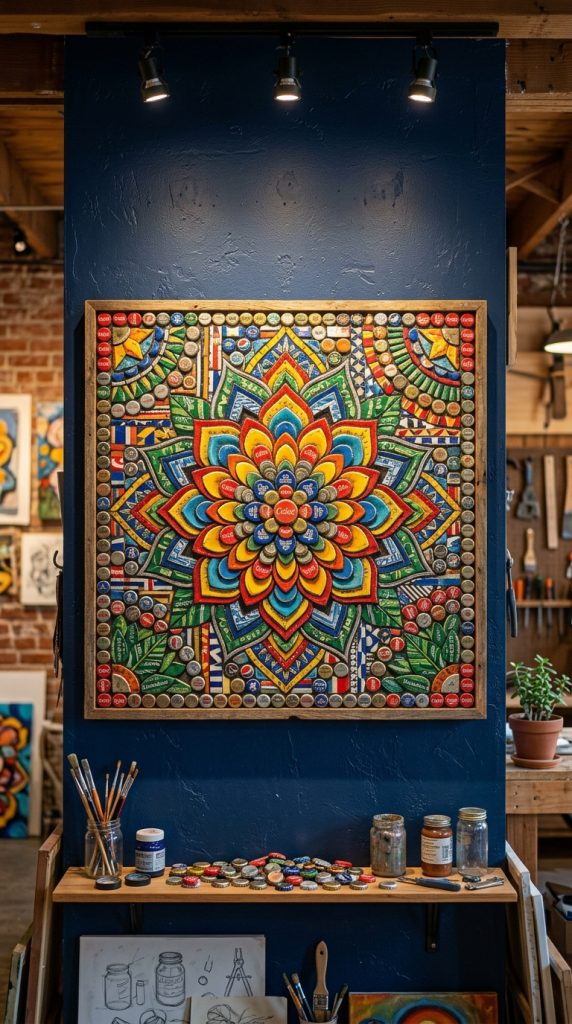
8. Bottle Cap Mosaic Art
Plastic and metal bottle caps can become colorful mosaic art instead of being discarded. Arrange them into flowers, initials, landscapes, geometric patterns, or pixel-style images.
Because every collection of bottle caps is different, each finished artwork has its own character.
Who This Project Suits Best
Bottle cap mosaics suit:
- Patient crafters
- People who enjoy bold wall art
- Families collecting recyclable materials
- Game-room or craft-room décor
- Fans of pop art and colorful designs
How to Make It
- Collect and clean a large number of bottle caps.
- Sort them by color and size.
- Draw a simple design on reused wood or thick cardboard.
- Arrange the caps without gluing them first.
- Adjust the design until the spacing looks balanced.
- Attach each cap with strong craft adhesive.
- Allow the artwork to dry flat.
- Add a frame when desired.
Styling Tips
Simple designs work best because bottle caps function like large pixels. Begin with a heart, flower, letter, or basic geometric pattern before attempting a detailed scene.
Leave a small, consistent gap between caps for a neat result.
Benefits
- Turns small waste items into art
- Creates a strong focal point
- Works with many décor themes
- Encourages long-term collection and reuse
- Produces durable, textured artwork
9. Upcycled Picture Frame Vanity Tray
An old or damaged picture frame can become a stylish tray for perfume, jewelry, candles, stationery, or small decorative objects.
Instead of displaying a photograph, the frame holds decorative paper, fabric, a mirror, or a painted cardboard insert.
Who This Project Suits Best
A picture frame tray works well for:
- Vanity and dressing-table organization
- Elegant or vintage bedrooms
- Small bathroom counters
- Desk accessory storage
- People who enjoy quick furniture-style makeovers
How to Make It
- Clean the frame and remove loose paint.
- Repair weak corners with glue.
- Paint the frame in a suitable color.
- Replace the photograph with fabric, wallpaper, decorative paper, or a mirror.
- Secure the backing firmly.
- Attach small reused drawer handles to both sides when desired.
- Add felt pads underneath to protect furniture.
Styling Tips
Metallic paint can give an ordinary frame a luxurious appearance. Black, white, gold, and antique bronze are versatile choices.
Line the tray with velvet from an unwanted garment for a premium finish.
Benefits
- Organizes small objects attractively
- Gives old frames a new function
- Requires minimal materials
- Works as a gift
- Can be customized to match existing furniture

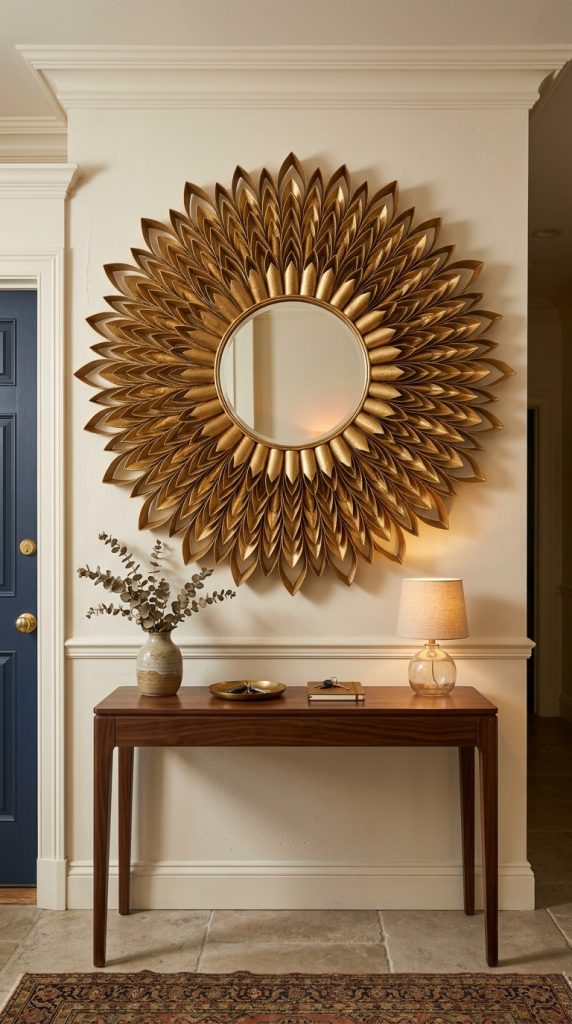
10. Toilet Paper Roll Floral Mirror Frame
Empty toilet paper rolls can be cut into curved shapes that resemble flower petals or leaves. When arranged around a basic mirror, they create an elegant decorative frame that looks surprisingly sophisticated.
This project proves that even the most ordinary cardboard waste can become beautiful wall décor.
Who This Project Suits Best
This mirror project is best for:
- Crafters who enjoy detailed work
- People decorating an entryway or bedroom wall
- Fans of floral and geometric patterns
- Anyone wanting statement décor on a tiny budget
- Homeowners and renters seeking lightweight wall art
How to Make It
- Flatten clean toilet paper rolls.
- Cut each roll into equal-width rings.
- Pinch the rings into petal or leaf shapes.
- Arrange the pieces around a small round mirror.
- Experiment with several layouts before gluing.
- Glue the cardboard shapes together.
- Paint the completed frame.
- Attach the mirror securely in the center.
- Add a suitable hanging mechanism.
Styling Tips
Metallic gold creates a sunburst effect, while matte black gives the frame a modern appearance. White or cream works well in romantic and minimalist interiors.
Use a ruler when cutting the rings so every piece has a consistent width.
Benefits
- Creates a dramatic wall feature
- Uses lightweight cardboard waste
- Can imitate expensive metal wall décor
- Offers many pattern possibilities
- Easy to personalize with paint
How to Make Recycled Decor Look Expensive
Recycled décor should feel intentional rather than unfinished. The secret is not the cost of the material but the quality of the final details.
Use a Controlled Color Palette
Choose two to four colors that already appear in your room. A limited palette makes unrelated recycled materials look like part of one coordinated collection.
Prepare Every Surface
Clean jars, remove labels, sand rough edges, and repair damaged cardboard before decorating. Paint and glue adhere better to prepared surfaces.
Repeat Materials or Shapes
Repeating the same jars, cans, colors, or geometric shapes creates visual harmony. A group of three matching pieces often looks more polished than a single random object.
Hide Construction Details
Cover exposed glue, uneven cardboard edges, tape, and rough cuts. Fabric trim, rope, paper borders, and paint can conceal imperfections.
Prioritize Function
The most successful recycled décor solves a problem. An item that organizes a desk, holds plants, stores blankets, or adds lighting is more likely to remain useful.
Pro Tips for Better Recycled DIY Room Decor
1. Collect Materials with a Purpose
Avoid keeping every empty package. Decide which projects you want to make, and collect only materials that are clean, strong, and suitable.
2. Test Paint Before Covering the Entire Item
Some plastic, glass, and metal surfaces require primer. Apply paint to a small hidden area first and check whether it peels after drying.
3. Use the Correct Adhesive
Ordinary paper glue may not hold glass, rope, plastic, or metal. Choose an adhesive designed for the materials you are joining.
4. Work in Layers
Several thin coats of paint produce a smoother finish than one heavy coat. Allow each layer to dry before applying the next.
5. Measure Before Cutting
Even simple recycled crafts look more professional when lines are straight, compartments are aligned, and repeated pieces are equal in size.
6. Combine Old and New Materials Strategically
The main structure can be recycled while small finishing supplies, such as safe hooks or strong adhesive, may be new. This improves safety and durability without significantly increasing the cost.
7. Start Small
Complete one small project before decorating an entire room. This helps you test your preferred style and prevents unfinished crafts from creating more clutter.
Common Mistakes to Avoid
Using Dirty or Damp Materials
Food residue, moisture, and dust can cause odors, mold, peeling paint, and weak glue bonds. Always wash and dry materials completely.
Ignoring Sharp Edges
Tin cans, cut plastic bottles, glass containers, and craft knives can cause injuries. Smooth or cover rough edges and use protective equipment when needed.
Adding Too Many Decorations
Ribbons, beads, paint, glitter, paper, and patterns can compete with one another. Choose one main feature and use the other details sparingly.
Using Weak Cardboard for Heavy Storage
Thin cereal boxes are suitable for lightweight organizers, but they cannot hold heavy books or large objects. Reinforce cardboard or select stronger packaging.
Skipping the Planning Stage
Gluing pieces immediately can lead to uneven layouts. Arrange all components first, take a reference photograph, and then attach them.
Forgetting About Maintenance
Consider how each item will be cleaned, watered, moved, or repaired. Decorations that collect dust or cannot tolerate moisture may need protective sealant.
Creating More Clutter
Recycling does not mean every waste item must become décor. Make projects that improve your room rather than filling it with unnecessary objects.
How to Choose the Right Project for Your Room
Begin by identifying what your room needs most.
Choose a cardboard organizer or rope basket when storage is the priority.
Choose jar lanterns when the room needs warmer lighting.
Choose magazine art, a bottle cap mosaic, or a floral mirror when the walls feel empty.
Choose tin can or plastic bottle planters when you want natural color and texture.
Choose a fabric garland when the space needs softness or a playful decorative feature.
Also consider the room’s available space. Hanging planters and wall organizers are helpful in small rooms because they use vertical surfaces. Trays, baskets, and planters need stable horizontal space.
Frequently Asked Questions
What is the easiest recycled room decor project for beginners?
Glass jar lanterns, fabric scrap garlands, and painted tin cans are among the easiest projects. They require few tools, involve simple steps, and can usually be completed in less than one hour.
How can I make recycled DIY decor look professional?
Use a limited color palette, measure carefully, prepare surfaces, hide rough edges, and apply paint in thin layers. Repeating similar materials or creating a matching set also makes recycled décor look more intentional.
What recycled materials are best for room decoration?
Glass jars, strong cardboard, tin cans, plastic bottles, old fabric, magazines, wooden packaging, bottle caps, and unwanted picture frames are versatile materials. Select items that are clean, dry, safe, and structurally sound.
Are recycled DIY room decor projects safe for children?
Many projects can be adapted for children, but adult supervision is necessary when using sharp scissors, craft knives, hot glue, metal cans, glass, or strong adhesives. Children can safely assist with painting, arranging, tying fabric, and selecting colors.
How do I protect recycled decorations from damage?
Use a suitable clear sealant, keep cardboard away from moisture, place saucers beneath planters, and avoid overloading lightweight storage. Regular dusting and prompt repairs will also extend the life of each project.
Final Thoughts
A beautiful room is not defined by how much money you spend. It is shaped by thoughtful details, useful objects, personal creativity, and the way each element makes the space feel.
These 10 recycled DIY room decor projects show that materials as simple as jars, cans, cardboard, fabric scraps, magazines, and plastic bottles can become attractive decorations with very little investment.
Start with one project that solves a real need in your room. Turn a box into an organizer, a jar into a lantern, or an old frame into a decorative tray. Once you see what is possible, you may begin looking at everyday waste as a source of creative potential rather than something to discard.
Choose your favorite project, gather the materials you already have, and begin your budget-friendly room transformation today. Share your finished creation with other DIY enthusiasts and inspire someone else to decorate more sustainably.
- Three glowing lanterns made from recycled glass jars, each jar decorated with delicate jute twine, frosted glass patterns, pressed wildflowers, and warm battery-powered fairy lights, arranged on a rustic bedside table in a cozy bohemian bedroom, soft golden evening lighting, gentle shadows, warm neutral background, eye-level three-quarter camera angle, editorial interior photography, inviting sustainable home decor aesthetic, high quality, ultra realistic, 4k, sharp focus.
- A handmade wall organizer constructed from recycled cardboard boxes, covered with coordinated beige linen fabric and botanical paper, multiple neat pockets holding notebooks, envelopes, pens, and stationery, mounted above a minimalist wooden desk, bright natural window lighting, clean modern home office background, front-facing camera angle, highly detailed functional DIY decor, social media and blog ready, high quality, ultra realistic, 4k, sharp focus.
- A stylish collection of recycled tin can planters painted in matte terracotta, cream, sage green, and charcoal, filled with healthy succulents and small herbs, displayed on a sunlit apartment windowsill, soft morning light, subtle urban background, close-up three-quarter camera angle, modern eco-friendly interior styling, realistic metal textures and fresh green leaves, high quality, ultra realistic, 4k, sharp focus.
- A large abstract wall artwork created from colorful recycled magazine clippings arranged into elegant geometric shapes, displayed above a contemporary bedroom desk, balanced palette of coral, mustard, teal, blush pink, and cream, bright diffused daylight, clean white wall background, straight-on camera angle, premium editorial craft photography, vibrant yet sophisticated composition, high quality, ultra realistic, 4k, sharp focus.
- A vertical indoor garden made from recycled plastic bottles transformed into elegant hanging planters, bottles painted soft white and muted green, filled with trailing ivy, herbs, and small flowering plants, suspended beside a bright apartment window with natural rope, fresh daylight, airy minimalist room background, low three-quarter camera angle emphasizing height, sustainable urban gardening aesthetic, high quality, ultra realistic, 4k, sharp focus.
- A handmade fabric scrap garland created from recycled floral cotton, linen, gingham, and pastel fabric strips, draped gracefully above a cozy bed with neutral bedding, soft bohemian bedroom decor, warm afternoon sunlight filtering through sheer curtains, slightly upward camera angle, detailed textile textures, relaxed cottage-inspired mood, polished lifestyle photography, high quality, ultra realistic, 4k, sharp focus.
- A decorative storage basket made from a recycled cardboard box wrapped perfectly in natural jute rope, lined with cream cotton fabric from an old shirt, holding a folded throw blanket beside a reading chair, warm Scandinavian-style living space, soft window lighting, eye-level camera angle, realistic rope and fabric textures, elegant budget-friendly organization, high quality, ultra realistic, 4k, sharp focus.
- A striking bottle cap mosaic artwork featuring a colorful floral and geometric pattern, made from carefully arranged recycled metal and plastic caps, displayed on a deep navy wall in a creative studio, focused gallery lighting with soft surrounding shadows, straight-on camera angle, vibrant pop-art aesthetic, highly detailed dimensional texture, bold sustainable statement decor, high quality, ultra realistic, 4k, sharp focus.
- An elegant vanity tray created from an upcycled vintage picture frame painted antique gold, lined with soft blush velvet, holding perfume bottles, delicate jewelry, a candle, and dried flowers, placed on a white dressing table, luxurious warm lighting, softly blurred bedroom background, close-up overhead three-quarter camera angle, refined feminine interior styling, high quality, ultra realistic, 4k, sharp focus.
- A dramatic floral sunburst mirror frame crafted from precisely cut recycled toilet paper rolls, painted metallic gold to resemble sculpted metal petals, mounted above a narrow console table in a sophisticated entryway, warm ambient lighting, cream wall and minimal decorative accessories, centered front-facing camera angle, detailed shadows and realistic cardboard texture, expensive-looking sustainable wall decor, high quality, ultra realistic, 4k, sharp focus.


Leave a Reply